5 AI tools in Adobe Lightroom Classic to boost your photo editing
Let AI help you edit your photos like a pro.

Adobe has been building artificial intelligence into applications like Photoshop for several years now. But Lightroom Classic, another of the company’s image editing programs, also features AI tools to quickly improve the look of your photos.
Underpinning it all is Adobe’s mighty AI muscle, trained on huge libraries of stock and publicly available images to generate new pictures. This means Lightroom Classic knows what a sky or a person looks like in a photo, and can make changes accordingly.
1. Select Background, Subject, Sky, and Object
Lightroom Classic mainly uses AI to detect the outline of people and objects against the background. This gives the software the ability to automatically select elements inside a photo to remove or edit them separately, saving you from wasting your time making pixel-by-pixel selections.
[Related: How AI is helping you edit photos]
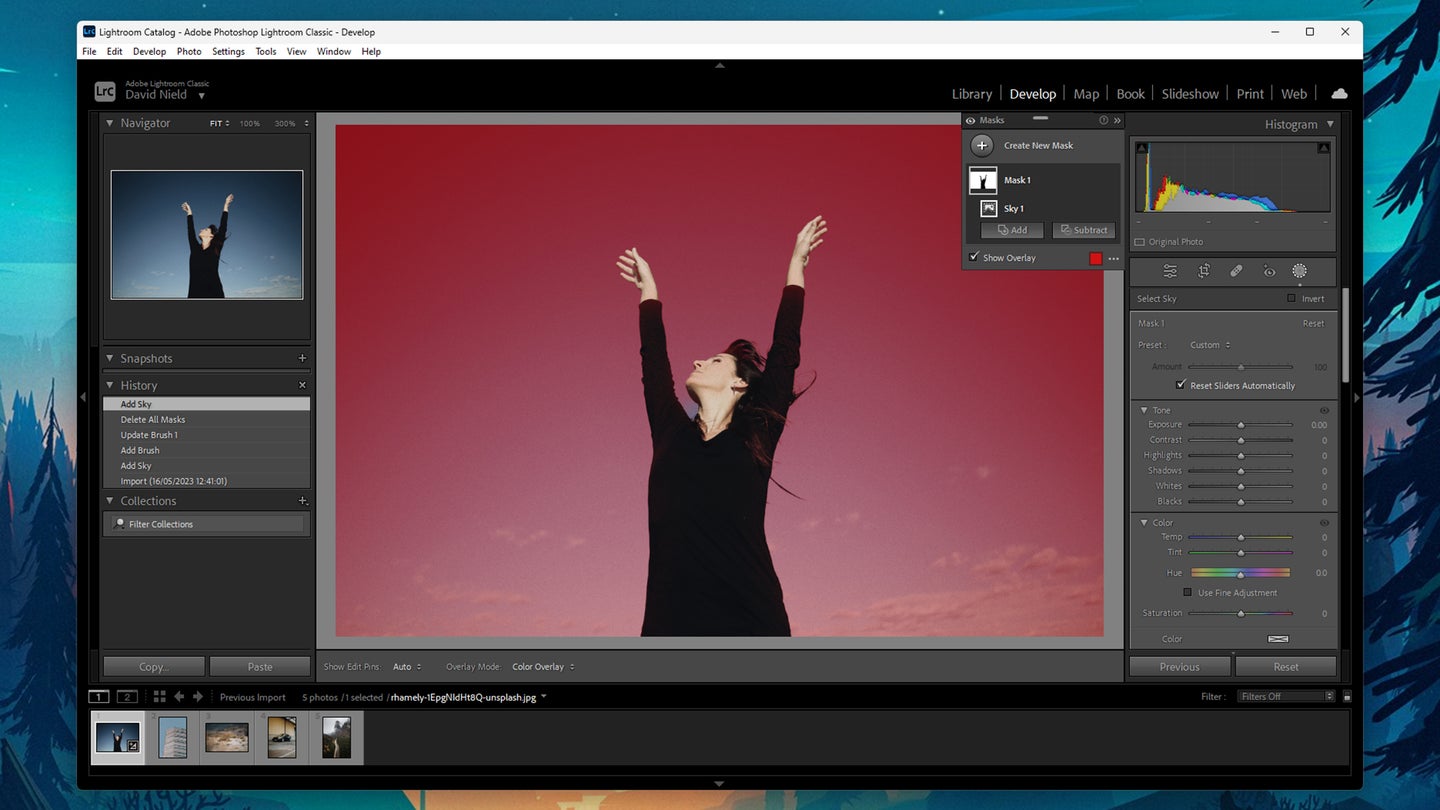
You can now use AI to pick out backgrounds, subjects, skies, and objects: Just click the Masking icon on the right (it looks like a circle inside a dash-lined square) and pick Subject, Sky, Background, or Objects. You’ll also be able to choose Brush for more precise control over where your selection goes.
The program will shade the new masked selection in red and you’ll be able to manipulate it as needed. For example, if you selected the sky, you’ll be able to tweak the brightness and contrast to make your photo appear sunnier. The Masks window, which will pop up on the right of your screen when you select something, is where you can switch between your masks, create new ones, and delete them. Just click the three dots next to each item to see a full set of options.
2. Content-Aware Remove
In Lightroom Classic you can use AI to quickly remove objects from your image. Click the Healing tool (the bandage icon), and then the Content-Aware Remove tool (it looks like the eraser on a pencil).
Use the sliders that pop up underneath the tool when you click it to change the size and opacity of the brush, and paint over the object you’d like to remove. Once you finish your selection, the program will get to work. Lightroom Classic automatically chooses which parts of the background to sample to replace the deleted object, but you can use Ctrl+click (Windows) or Cmd+click (macOS) to specify a particular area, such as a blue sky.
3. Curves
Another AI enhancement you’ll find in Lightroom Classic is the ability to tweak the curves on masks, bringing the application closer to Photoshop in terms of capabilities. With a mask already selected, open up the Curve panel on the right, and play around with the interface.
This works just like the Tone Curve tool, but it only applies to the area of the picture under the mask. Along the top of the panel you’ll see selectors for the red, green, and blue channels—use them for more precise adjustments.
4. Denoise
The Denoise tool removes graininess or unwanted variations in the tone or luminance of a picture while keeping the important details. The only caveat is that this feature only works on Bayer or X-Trans RAW images.
Choose Photo, Enhance, and then check the Denoise option so that the AI can work its magic. The slider underneath the tool’s icon lets you control how aggressive it is—you can check the preview panel on the left to see the difference before you commit any changes. When you’re happy with the level of denoising, click Enhance to confirm your choice.
5. Adaptive Presets
The presets in Adobe Lightroom Classic work like filters in that they let you easily apply a look or effect to an entire image. But Adaptive Presets use the power of AI to transform specific areas of a photo.
[Related: 5 apps to edit photos right in your browser]
To find them, go to the Presets dialog box on the left and click on the small arrows right next to it to see the full list of Adaptive Presets. For example, you can select Storm Clouds to add a bit of drama to the sky or Enhance Eyes to highlight the peers in a portrait.
Open up the Masks window via Tools and Masking to see the mask that Lightroom Classic’s AI created to apply the effect. You can edit this mask as any other, allowing you to use the brush tool to change the outline of the selection the program has come up with, for example.